My last post on Renovation Adventure was showing the steps that were taken to build up the Red Room from its original state to one that we felt was a good first attempt at a bedroom renovation. Jami and I have now changed our focus onto the Blue Room, and this room unlike the Red Room had different challenges all its own.Â
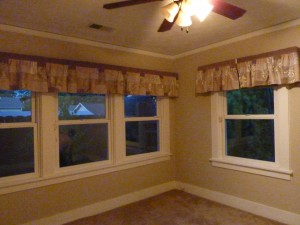
 The Blue Room was originally carpeted when we took position of the place, the carpet and underlay were in reasonable condition – however with my allergies and asthma it clear that we had to go out with the old and in with the new. As I stated previously Jami had been renting for over 11 years in the same place, a beautiful place – but entirely egg-shell white in appearance and to be honest we thought it good to be a little bold with our colour choices.Â
The Blue Room sits at the back of the house, with three new vinyl windows to the East and one new vinyl window on the South wall. It should be stated that whoever updated the home did spend well in certain areas, besides the alarm system and the kitchen counters the windows were an excellent choice. They are vinyl, double glazed and each comes with a bug screen and nicely done Accordion style window shades cut to measure. Yes the Blue Room had a good base but one must tackle the out dated appearance of the other features.Â
The Valences were something that reminded me of patchwork quilts or burlap sacks, though I am sure that whoever installed them thought they were beautiful at one time or another Jami wanted them gone. I also had full understanding that there was original hardwood flooring under that carpet – just didn’t know what its condition was.Â
**TIP** When shopping for a house and if you are not sure if they have original hardwood under the carpet, simply look for a heating vent or cold air return vent on the floor and quickly remove the vent looking at the cross section of the wood below. If there is hardwood it normally will show as clear as day under the underlay and carpet.Â
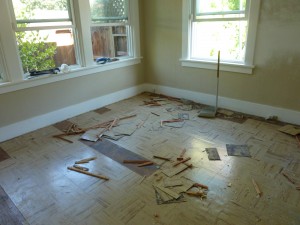
Once I removed the carpet, the underlay and had blown my ACL doing a lateral lift with a rooms full of Carpet in my arms, I found that 8â€x8†linoleum tiles were under the carpet. The tiles were probably from the 40’s or 50’s or sometime in the past when organic materials fell out of favour and were replaced by the miracle product known as plastic.Â
With a quick sharpen to the blades on both the crow-bar and the nail puller Jami and I then began the task of popping the linoleum tiles up off the ground.Â
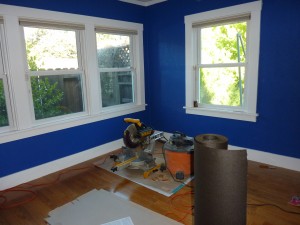
So – Once the carpet the tack boards, the tile were all taken away I began the instillation of the engineered hardwood flooring we had purchased and had acclimatizing in our home for about a week.Â
**TIP**When installing solid hardwood flooring or engineered hardwood, one must make sure that the wood has acclimatized to your moisture and humidity of your home and remember that hardwood isn’t static, it grows and shrinks with the changes of the seasons and putting a dry load of hardwood into a house with moisture could cause serious buckling and expansion of the planks could cause serious problems.Â
First thing I did was I laid down a layer of oiled felt paper (tar paper) why did I do this? Well really it’s not crucial to have paper or vapor barrier down when installing a nail down hardwood floor, however I did it because it gave me a clean, smooth surface to move my pieces around as well as adding squeak proofing between the hardwood and the subflooring.Â
Installing hardwood (when using the proper tools) is incredibly easy you will need:Â
- Miter saw (aka rip saw) with a fine toothed blade for smooth cuts
- Knee pads
- Hammer or rubber mallet (so not to dent the hardwood)
- Tape Measure (measure twice – cut once)
- Tar paper or poly vapour barrier to lay down for your work surface
- Good clear marker or pencil
- Straight edge for marking trimming
- Caulking (I used a matching brown caulking to fill in any expansion gaps around doors or areas I can’t cover with the new baseboards)
- Your hardwood + 20% additional sq ft as you will make mistakes and screw up.
- Remember eat and keep your mind fresh – there is nothing worse than being tired and hungry and making a costly mistake cutting a piece of hardwood the wrong way. Remember … eat and drink and stay sharp.
Now getting your first row of planks down straight is the hardest task as no freaking wall created by man is square – and if you follow a crooked wall you might make the flooring go offline and look odd in comparison to the room.
I rented a brad stapler gun and compressor to help me do the job quickly as with engineered hardwood you don’t have a huge slab of wood you need to nail through – just a thin sheet of plywood.Â
Most hardwoods now are tongue and groove instead of strips like the old days – and the seams that are created by inter-locking the tongue and groove is excellent and looks very professional.Â
Now I would normally go left to right across the floor measuring only the last piece of wood before cutting it to size and then taking the remainder of that piece and using it to start again on the left side of the room again. Basically you repeat that step over and over again until you get a covered floor. Now as you approach the wall you may not be able to put brads or nails in at the angle that you desire – so you will either need to use brads or nails going straight down on the edges or glue or combination of the both to insure a tight bond of the hardwood.Â
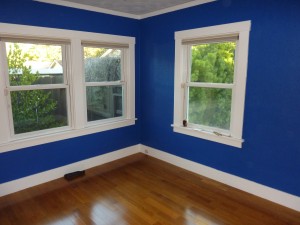
Once the hardwood was installed Jami and I then installed the MDF boards (that have already been primed and painted) over the flooring to cover up the expansion gaps that I left to accommodate movement of the hardwood flooring in changing seasons.Â
Here is a before and after, let us know what you think… Â


3 comments
Aimee says:
October 21, 2014 at 9:36 am (UTC -7)
How many of you are looking for job ? Today i quit my day job, now i earn online,
you can earn too. 2 months ago i was searching internet for money
making ideas and found interesting roulette system. I
gave it a try and now make 80 £ / day. If
you want more info just type in google – platinum system how to beat roulette
Robby says:
January 24, 2015 at 9:22 pm (UTC -7)
Webmaster do you want unlimited content for your page?
Type in google:
Nysrisar’s tool
melisa8815 says:
April 16, 2015 at 8:26 pm (UTC -7)
hank you for the good writeup. It in fact was a amusement account it. Look advanced to more added agreeable from you! However, how could we communicate? Download Stormblades Free Hack for iOS Android